On Strattic, a simple click of a button converts your WordPress website to static headless architecture. As to how long it takes for your website to become static after you click that button, well that really depends on its size, how it was built, and its purpose. In this article, we’ll go over 3 easy tips to ensure you’re publishing the fastest way possible.
Tip 1: Configure your Strattic publishing settings
Knowing what features you use and need on your WordPress website, and those you don’t, can help you optimize your static publishing time.
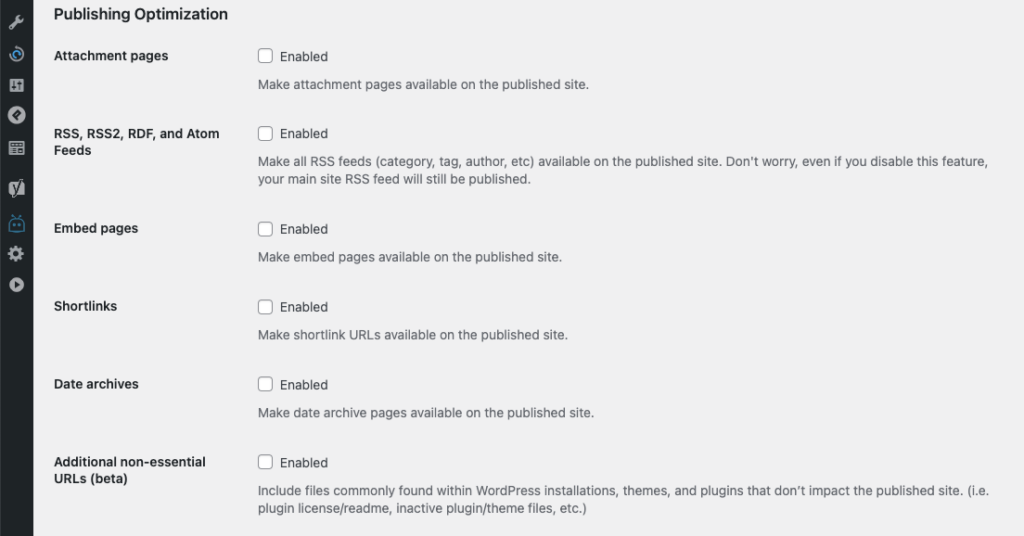
Here are some examples of content types that are often not needed and you can exclude from your static publish in the Strattic settings to speed things up:
Attachment Pages
Each time you upload an image to your WordPress media library, an additional page is created for that image called an Attachment Page. Some sites utilize these pages, but most don’t. In fact, Yoast SEO has a setting for automatically redirecting Attachment Page URLs to the media file itself – that’s how useless this is. On Strattic, you can choose to exclude all Attachment Pages from the publish, which can add to savings of up to hundreds and even thousands of URLs!
Month and Day Pages for Posts
By default, in WordPress, every new post gets an additional page for the month and day it was published. Although some websites make use of these pages, a large number don’t, so if you don’t need them, there is no need to publish them statically.
Embed Pages
Every URL in a WordPress site gets an accompanying Embed Page. The goal of these pages is to make WordPress nicely embeddable in other sites. However, this is unnecessary if you’re sharing links from your site on social media, so the use case for the embed pages is pretty limited. By excluding Embed Pages from your publish, you can cut down on a very significant portion of URLs!
Publishing optimization settings can be found within your WordPress dashboard by going to Strattic > Settings and clicking on the Advanced tab. I would recommend that you disable as many of the Publishing Optimization options as possible. This will dramatically speed up your static site generation.

You can find more detailed information on what each of the options does here in our help center.
Tip 2: Choose the best publishing type for the changes you have made
Strattic has three different publishing types. It is beneficial to know what each type actually publishes so you can select the option that will give you the fastest static publish.

Full Publish – publishes every URL on your site, including media, CSS etc. Great for your first publish, and for changes that impact many parts of your site, like updates to your navigation or footer. Since this publish is so comprehensive, it can also take a long time.
Quick Publish – a more focused publish that deploys pages affected by changes. For example, if you write a new blog post, a Quick Publish will just update the post itself, related media, the main blog archive, categories, tags, author pages and the home page.
Selective Publish – this publish option only appears when you’re viewing or editing a page or post. When you click it, it will deploy only that URL for the fastest publish to static.
Learn more about the various publish options in our support docs.
Tip 3: Your website should have the right plan
Choosing the best Strattic plan for your needs is crucial. Some of our tiers offer additional resources on the container level for faster publish times, and this can have a significant impact on larger websites.
To learn more about our Enterprise and Agency plans, or to create a custom plan, you can contact us via our live chat.
Strattic is all about speed – on every level
Reviewing your Strattic settings and learning about our static publishing types will not only enable you to make the best choice for your publishing needs, but will also allow you to publish faster than ever before.


